
 Mirage 2000
Steve Davies - Dec 2010
Having only just taken delivery of an EDF airframe - the Top Gun Park Flight Mirage 2000, I thought I would have a go at my first kit review. I have read so many of them now in those glossy magazines, how hard can it be?
 So
where did it all start for me. As a child my dad was always playing with kites and catapult
launch gliders, taking me to air shows and parking outside RAF stations with our sandwiches
watching the Vulcans, Harriers and Jaguars. I then discovered Airfix kits and spent many happy
hours with, glue and paint however there was usually more on me than on the planes much to my
mothers dismay. Decorating my ceiling with them and dreaming they would come to life. Then in my
mid-twenties, I purchased my first glider kit. A Precedent Hi-Fly 2 channel glider and a 27 MHz
radio. After a lot of trial and error and a household iron it was finished and very proud I was
too. I learnt hard and fast with my first flight taking place over a cliff near Lossiemouth. At
the time I was working at RAF Lossiemouth as a civilian with an all areas pass and this just
fuelled my passion for flight. I can still remember the nerves of that first flight, on my own
with the elevator the wrong way up on the sticks. Well you can imagine the fun I had that day.
The repairs were endless needless to say and it was not until I bumped into a work colleague in a
model shop that things really took off for me. He gave me the help, support, patience, advice and
lots of sticky tape I needed to conquer the hobby. The trips to the bottom of the hill were
endless to pick up the bits! My eyes were opened to all the possibilities and I just could not
get enough. In time, I purchased my first 35 MHz computer radio which allowed me to progress to
more complicated and exciting aircraft.
So
where did it all start for me. As a child my dad was always playing with kites and catapult
launch gliders, taking me to air shows and parking outside RAF stations with our sandwiches
watching the Vulcans, Harriers and Jaguars. I then discovered Airfix kits and spent many happy
hours with, glue and paint however there was usually more on me than on the planes much to my
mothers dismay. Decorating my ceiling with them and dreaming they would come to life. Then in my
mid-twenties, I purchased my first glider kit. A Precedent Hi-Fly 2 channel glider and a 27 MHz
radio. After a lot of trial and error and a household iron it was finished and very proud I was
too. I learnt hard and fast with my first flight taking place over a cliff near Lossiemouth. At
the time I was working at RAF Lossiemouth as a civilian with an all areas pass and this just
fuelled my passion for flight. I can still remember the nerves of that first flight, on my own
with the elevator the wrong way up on the sticks. Well you can imagine the fun I had that day.
The repairs were endless needless to say and it was not until I bumped into a work colleague in a
model shop that things really took off for me. He gave me the help, support, patience, advice and
lots of sticky tape I needed to conquer the hobby. The trips to the bottom of the hill were
endless to pick up the bits! My eyes were opened to all the possibilities and I just could not
get enough. In time, I purchased my first 35 MHz computer radio which allowed me to progress to
more complicated and exciting aircraft.
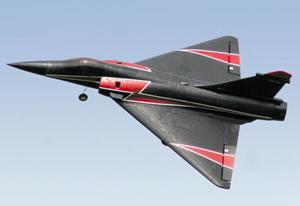
At this time NiCads and NiMh were our power packs, with their brushed motors and excessive weight, they were just too heavy. My first EDF was a Kyosho F16. I was totally in awe when they first came out and I just had to have one. So with hard earned cash in hand I picked one up and ran all the way home and started building it immediately. When finished it just looked amazing to me. No propeller, smooth, sleek and made of polystyrene. Well I just had to fly it. After clockwatching at work the whole next day, I rushed to a local field, set up, and with full throttle launched it into the air. Well, after about all of 6 feet it went nose first into the dirt. The nose snapped clean off behind the cockpit and I was devastated. I picked up the bits with thorough disappointment. That plane never flew properly. I tried in on the flat; I tried it on the slope. I rebuilt it, repainted it and the best I ever got was a tail heavy painful couple of circuits. All in all it was too heavy and just did not have enough power. Eventually it went on Ebay and I used the money to purchase a Wattage Mirage pusher. These little planes were brilliant and it is such a shame you cant get them anymore, especially with the advent of brushless motors and Lipo batteries.
 Le
Mirage
Le
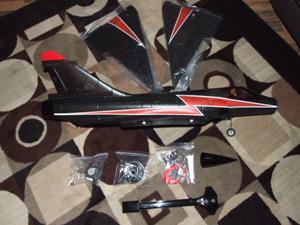
MirageSo enough of my rambling, lets talk about the kit. I have always liked the Mirage with its simple and forgiving delta wing, and with the advances now made in EDF and my Kyosho (yes I tried them again) Tornado swing wing jet flight tested and given the thumbs up on a stock set up, I thought it was time for another one. The only question was what to choose? Well Ebay came to the rescue again. I managed to find an airframe only (but with fan) Mirage for the princely sum of £45 plus postage. Needless to say I was delighted at my find. The model arrived just three days later in a brightly coloured box. All the parts were bagged and secured. The only disappointment was that the postal service had not handled my latest pride and joy with the kid gloves I would have preferred.
The polystyrene base of the box had a hole in it (no damage to the plane
thank goodness) but one of the wing servo horns had been pushed down into the soft aileron but
fortunately no major damage. The plane is made of the now typical polystyrene and is fully
painted. The colour scheme is that from the movie Les Chevaliers du Ciel (Sky Knights or
Knights of the Sky or Sky Fighters if you have telly with subtitles and translation being
dependant on where you east Asian TV was made). Its a bit of a French Top Gun type
flick.

There are very few parts in the kit which consists of the following:
Fuselage with pre fitted rudder, rudder and nose wheel push rod and canopy, nose cone, two wing halves, a 65mm fan, plastic fins for the tail and behind the canopy. Rear wheels, servo extension leads, glue and lots of screws.
The vital statistics are: -
 The plane has a
much larger presence than I expected and is well finished. The first thing I noticed is that the
instructions are written for the ARTF model and does not give much information at all regarding
where all the bits go. So I spent the next couple of days studying pictures on the box to figure
it all out. The model is generally well thought out and there are no obstructions in the intakes
or efflux tube other than the fan and motor as all the wires are in a channel on the belly of the
airframe. It all looks very smooth in there and certainly seems promising. Originally my plan was
to remove the wheels for flying at Calder Park, but this is not so easy as the nose wheel is
pre-installed and can not be readily removed without taking out the battery compartment and
damaging the plane. The wheels and fixing look to be fairly sturdy and the YouTube videos I have
seen show you can land the plane very slowly and drop it on the ground. You can also hand launch
this model so with a bit of luck and care I am hopeful to be able to fly the plane with the
wheels on at Calder Park. If the landings prove to be troublesome then I will be carrying out
surgery to remove that nose wheel. The rudder and nose steering are all controlled by one servo
which fits in a neat hole under a hatch on top of the fuselage. The cable then drops down between
the intakes to the underside where the receiver will go. So having figured what goes where it was
out with the glue. The first thing was to remove the sticky tape from the edges of the wings
themselves and on the fuselage roots. The tape unfortunately did not come off in one go and took
about half an hour to remove all the bits. Gluing is a simple and straightforward job, but the
glue supplied with the kit is not very good at all, I ended up using epoxy. Next, I slit the
polystyrene on the tail and behind the canopy and glued in the plastic stabiliser fins. Once the
wings were set I fitted the rear undercarriage and glued on the nose cone. Here we now have the
finished plane minus the electrics.
The plane has a
much larger presence than I expected and is well finished. The first thing I noticed is that the
instructions are written for the ARTF model and does not give much information at all regarding
where all the bits go. So I spent the next couple of days studying pictures on the box to figure
it all out. The model is generally well thought out and there are no obstructions in the intakes
or efflux tube other than the fan and motor as all the wires are in a channel on the belly of the
airframe. It all looks very smooth in there and certainly seems promising. Originally my plan was
to remove the wheels for flying at Calder Park, but this is not so easy as the nose wheel is
pre-installed and can not be readily removed without taking out the battery compartment and
damaging the plane. The wheels and fixing look to be fairly sturdy and the YouTube videos I have
seen show you can land the plane very slowly and drop it on the ground. You can also hand launch
this model so with a bit of luck and care I am hopeful to be able to fly the plane with the
wheels on at Calder Park. If the landings prove to be troublesome then I will be carrying out
surgery to remove that nose wheel. The rudder and nose steering are all controlled by one servo
which fits in a neat hole under a hatch on top of the fuselage. The cable then drops down between
the intakes to the underside where the receiver will go. So having figured what goes where it was
out with the glue. The first thing was to remove the sticky tape from the edges of the wings
themselves and on the fuselage roots. The tape unfortunately did not come off in one go and took
about half an hour to remove all the bits. Gluing is a simple and straightforward job, but the
glue supplied with the kit is not very good at all, I ended up using epoxy. Next, I slit the
polystyrene on the tail and behind the canopy and glued in the plastic stabiliser fins. Once the
wings were set I fitted the rear undercarriage and glued on the nose cone. Here we now have the
finished plane minus the electrics. 
She certainly does look impressive! The servos are all of the mini variety and simply fit in the slots provided. One in each wing and one in the fuselage for the rudder / nose wheel steering. I secured the servos with double sided servos pads, tested they were going the right way and connected up to the provided clevises and pushrods&bingo, job done. The servo wires in the wings fit into the provided grooves and get covered with black tape. The wires lead to a central channel in the bottom of the fuselage at the base of the fan where there is a larger cut out section for the speed controller. The channel carries the servo leads and power cables to the front of the plane where there are two openings for the receiver and battery. Finally the channel has a plastic cover over it with vent holes for speed controller cooling. What I have not mentioned yet is the fan and motor.
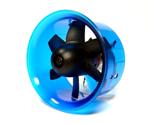 The
fan itself has 5 blades and fits very snugly into the body. This is where I came across some
difficult decisions. What kind of motor do I put in, and is the supplied fan up to the job. The
motor needed is a 400 size brushless inrunner. I searched hard and long to find the spec for the
stock motor but even with the part number I could find nothing online. I did consider the Hoffman
Mighty Mite EDF motor but at £65 this is a lot of motor and I felt that there would be
other cheaper alternatives that would suit. Also the Hoffman motor would need a new fan as the
securing collar provided would be too small for a Hoffman spindle. So back on the net I found a
new 6 blade 64mm fan with 5200kv brushless giving 670g of thrust off a 3s. I emailed the seller
in Hong Kong and they confirm it does what it says on the box and for the crazy price of £17.90
with free postage. Thats 5200 revolutions per volt!! The fan probably needs balancing but I
ordered one anyway and I am waiting delivery at the moment. All I can say is I am really looking
forward to test flying the Mirage. The elevons are a good size but the rudder is rather small and
probably will have little effect at low speed. But then I wont be going slowly very often. More
turn and burn, bank and yank for me!!!
The
fan itself has 5 blades and fits very snugly into the body. This is where I came across some
difficult decisions. What kind of motor do I put in, and is the supplied fan up to the job. The
motor needed is a 400 size brushless inrunner. I searched hard and long to find the spec for the
stock motor but even with the part number I could find nothing online. I did consider the Hoffman
Mighty Mite EDF motor but at £65 this is a lot of motor and I felt that there would be
other cheaper alternatives that would suit. Also the Hoffman motor would need a new fan as the
securing collar provided would be too small for a Hoffman spindle. So back on the net I found a
new 6 blade 64mm fan with 5200kv brushless giving 670g of thrust off a 3s. I emailed the seller
in Hong Kong and they confirm it does what it says on the box and for the crazy price of £17.90
with free postage. Thats 5200 revolutions per volt!! The fan probably needs balancing but I
ordered one anyway and I am waiting delivery at the moment. All I can say is I am really looking
forward to test flying the Mirage. The elevons are a good size but the rudder is rather small and
probably will have little effect at low speed. But then I wont be going slowly very often. More
turn and burn, bank and yank for me!!!
 Test
Flight
Test
FlightWell as time is not on my side I just wont get a test flight complete in time for going to print. So alas, I will have to wait until the model is completed and the weather is getting better. Knowing me I will wait for the almost perfect day for the maiden in the New Year and the plane will make a few trips to the field before I decide to commit to the heavens. So I will be looking for a launcher so see you down the field. I will be the one with the Top Gun T shirt and aviator glasses.